How to Cook a Perfect Beef Sirloin Tip Roast
If you’re looking for an affordable cut of beef that can deliver a wonderfully flavorful and tender roast dinner without breaking the bank, let me introduce you to the sirloin tip roast.
While it’s a leaner cut, with the right technique, it can be transformed into a succulent, perfectly cooked roast that’s ideal for slicing and serving with your favorite sides.
The secret to a great sirloin tip roast is a two-stage cooking process. We’ll start by searing the outside in a hot pan to create a deep, savory crust packed with flavor.
Then, we’ll let it cook low and slow in the oven, surrounded by aromatic garlic and herbs, until it reaches the perfect internal temperature. The result is a roast that is juicy, tender, and incredibly delicious.
This recipe is your blueprint for a classic and impressive roast beef dinner that is surprisingly simple to execute. Let’s get our pans hot and start cooking.
Quick Recipe Snapshot
Here’s a quick look at the timeline for this classic and impressive roast.
| Prep time | Cook time | Total time | Yield | Skill level | Spice level |
|---|---|---|---|---|---|
| 15 minutes | 1.5 – 2 hours | ~2 hours (+ resting) | 6-8 servings | Easy | Mild |
Ingredients
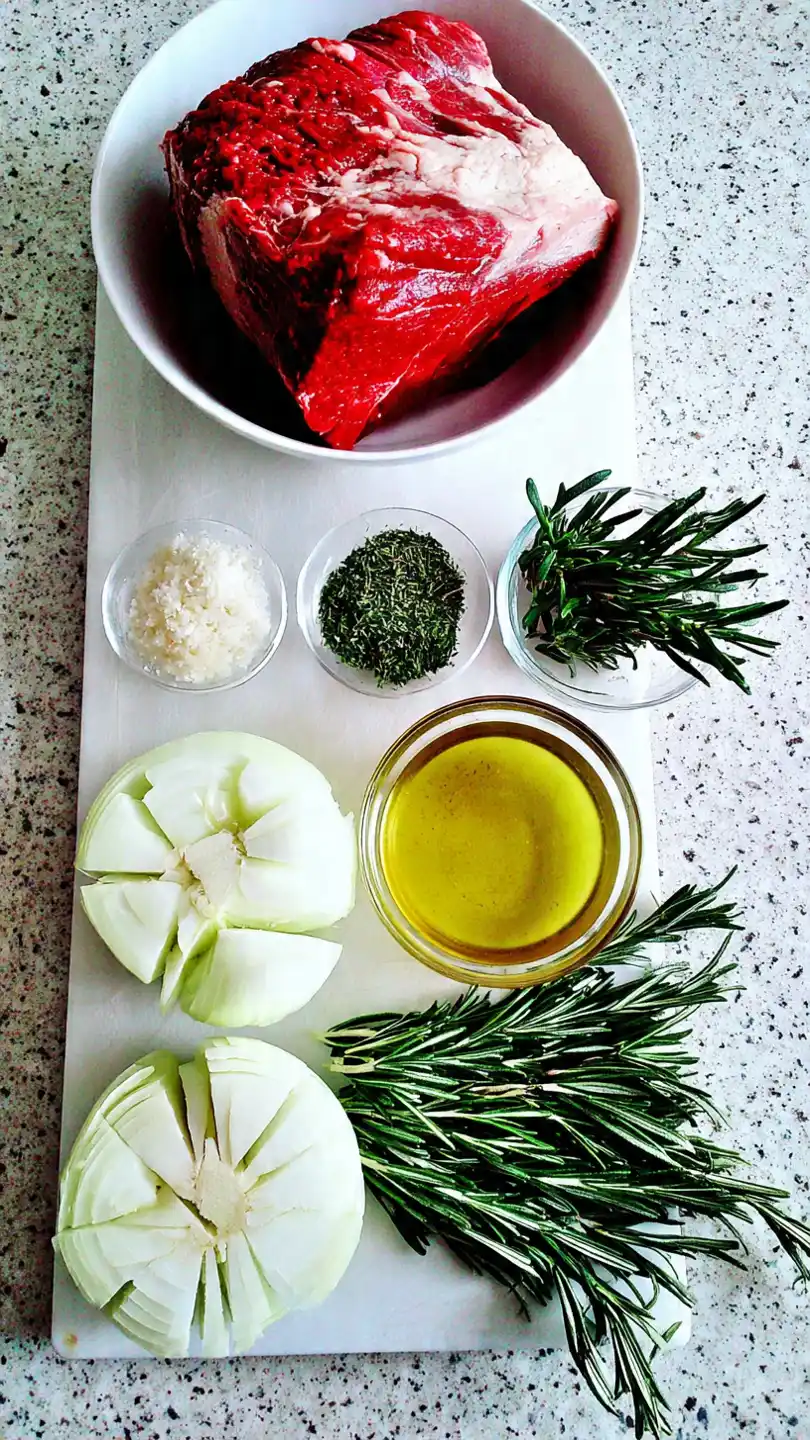
This classic roast uses a simple but powerful combination of herbs and seasonings to let the beef flavor shine.
- Beef Sirloin Tip Roast: One 3-4 pound roast. This cut is also sometimes called a knuckle roast.
- For the Herb Rub:
- Garlic: 4-5 cloves, minced.
- Fresh Rosemary: 2 tbsp, finely chopped.
- Fresh Thyme: 2 tbsp, finely chopped.
- Coarse Salt: 1 tbsp.
- Coarsely Ground Black Pepper: 1 tbsp.
- Olive Oil: 2 tbsp.
- For Roasting:
- Olive Oil: 1 tbsp, for searing.
- Onion: 1 large, cut into thick slices to create a roasting rack.
- Beef Broth: 1 cup, for the pan.
The Flavor Architects A Look at the Ingredients
- Garlic: Using fresh, minced garlic in the rub creates an intensely aromatic and savory crust that perfumes the entire roast as it cooks.
- Rosemary & Thyme: This classic herb duo is the perfect partner for roasted beef. Rosemary provides a pine-like, peppery aroma, while thyme adds a gentle, earthy, and slightly minty note.
- Coarse Salt & Pepper: A generous coating of coarse salt and pepper does more than just season the meat; it helps to create a beautiful, textured crust when the roast is seared.
- Onion “Rack”: Placing the roast on a bed of thick onion slices elevates it off the bottom of the pan, allowing air to circulate for more even cooking and preventing the bottom from steaming. The onions also release their sweet, savory flavor into the pan drippings.
Essential Tools
A few key tools are important for achieving a perfectly cooked roast.
- Large, oven-safe skillet (cast-iron is perfect) or a roasting pan
- Instant-read meat thermometer (highly recommended for perfect results)
- Tongs
- Cutting board with a juice groove
- Sharp carving knife
Cooking Instructions
This impressive roast is surprisingly straightforward, relying on a simple sear and a slow roast to achieve perfection.
Step 1: Prepare the Herb Rub and Season the Roast
First, take your sirloin tip roast out of the refrigerator and let it sit at room temperature for about 30-60 minutes. This helps it cook more evenly.
Pat the entire roast completely dry with paper towels. In a small bowl, combine the minced garlic, chopped rosemary, chopped thyme, coarse salt, black pepper, and 2 tablespoons of olive oil.
Mix them together to form a thick, fragrant paste. Rub this paste all over the entire surface of the roast, making sure it’s evenly coated.
Step 2: The All-Important Sear
Preheat your oven to 325°F (165°C). Heat 1 tablespoon of olive oil in your large, oven-safe skillet over high heat. The pan needs to be very hot to create a good crust. Carefully place the seasoned roast in the hot skillet.
Sear the roast for 3-4 minutes per side, until a deep, dark brown crust has formed. Use tongs to sear the ends of the roast as well. This step is fundamental for developing a rich, roasted flavor. Once seared, remove the roast from the skillet and set it aside for a moment.
Step 3: Assemble for Roasting
Reduce the heat under the skillet to medium. Arrange the thick onion slices in a single layer on the bottom of the same skillet, creating a natural roasting rack. Place the seared roast directly on top of the onion slices.
Pour the beef broth into the bottom of the skillet, around the onions. This will create steam in the oven, keeping the roast moist, and will also form the base for a delicious pan gravy later.
Step 4: Roast Low and Slow
Transfer the skillet to the preheated oven. Roast for about 20-25 minutes per pound. For a 3-4 pound roast, this will be approximately 1 hour and 15 minutes to 1 hour and 45 minutes.
The most reliable way to check for doneness is with an instant-read meat thermometer. For a perfect medium-rare, you’ll want to pull the roast from the oven when the internal temperature reaches 130-135°F. For medium, aim for 140-145°F.
Step 5: The Crucial Rest
Once the roast has reached your desired temperature, immediately transfer it from the skillet to a large cutting board. Tent it loosely with aluminum foil and let it rest for at least 15-20 minutes before you even think about slicing it.
This step is absolutely essential. It allows the juices that have been pushed to the center of the roast during cooking to redistribute throughout the meat, resulting in a tender and juicy slice.
Slicing too early will cause all those delicious juices to run out onto your cutting board. After resting, use a long, sharp carving knife to slice the roast thinly against the grain.
Recipe Variations
This simple roasting method is a great base for different flavor profiles.
- Spicy Version: Add 1-2 teaspoons of red pepper flakes or smoked paprika to the herb rub for a bit of warmth and spice.
- Add Root Vegetables: You can turn this into a one-pan meal by adding chunks of carrots and potatoes to the pan around the roast for the last hour of cooking.
- Slow Cooker Method: After searing, place the roast and onions in a slow cooker. Add the broth and cook on LOW for 4-6 hours, or until it reaches your desired internal temperature. This method is closer to braising and will result in a more “pot roast” texture.
Serving Suggestions
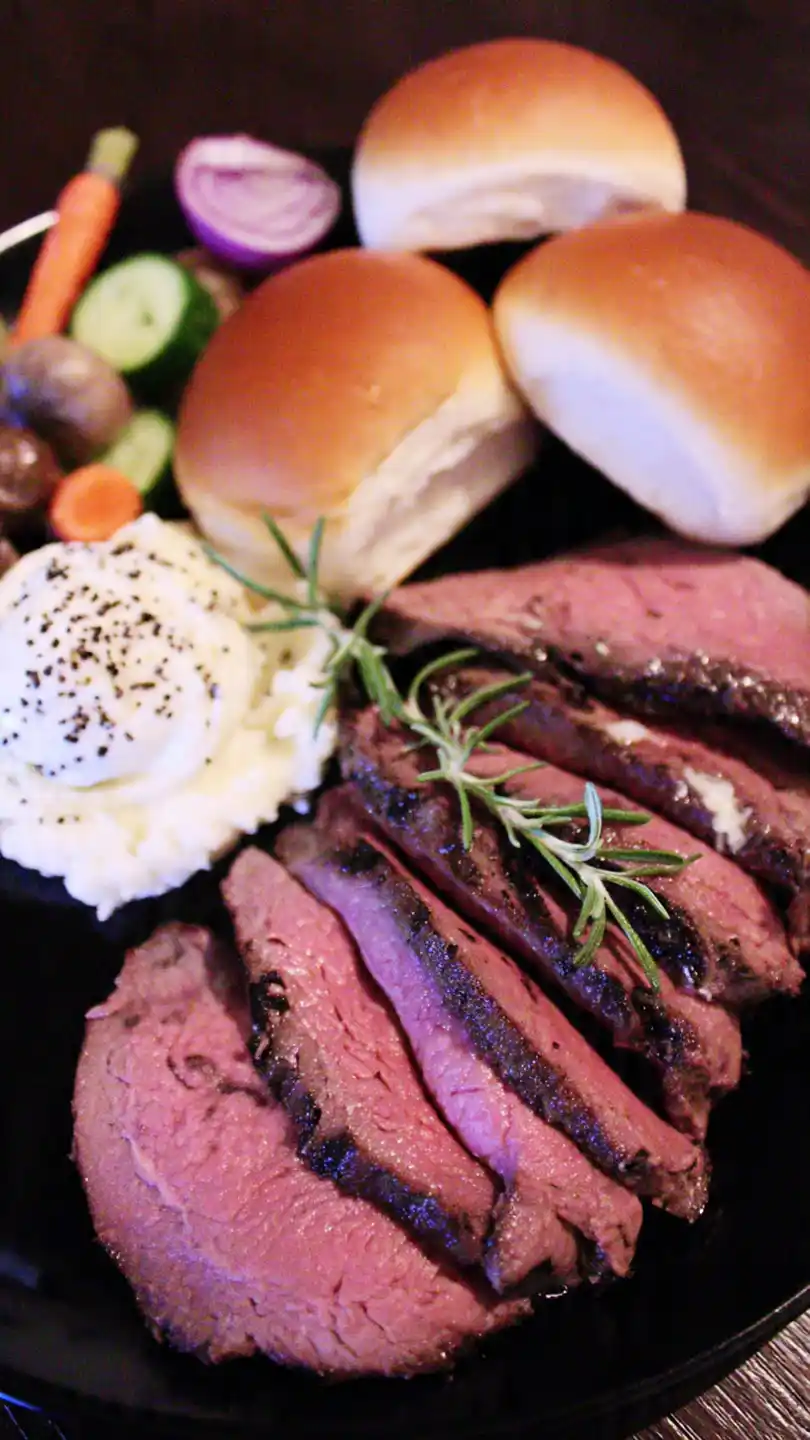
A classic beef roast pairs wonderfully with traditional, comforting side dishes.
- Pan Gravy: The leftover drippings and broth in the roasting pan are the perfect base for a rich gravy. Simply strain the liquid, skim the fat, and thicken it on the stovetop with a cornstarch slurry.
- Mashed or Roasted Potatoes: Creamy mashed potatoes or crispy roasted potatoes are the perfect starchy accompaniment.
- Steamed or Roasted Vegetables: Serve with a side of simple steamed green beans, roasted Brussels sprouts, or honey-glazed carrots.
- Yorkshire Puddings or Dinner Rolls: A fluffy Yorkshire pudding or a soft dinner roll is essential for soaking up any extra gravy.
Storage & Reheating Tips
Leftover roast beef is a treat and makes for incredible sandwiches.
- Storage: Let the roast cool completely. Store leftover sliced roast beef in an airtight container in the refrigerator for up to 4 days. Store any leftover gravy separately.
- Reheating: Reheating roast beef without drying it out can be tricky. The best method is to place the slices in an oven-safe dish, add a splash of beef broth or leftover gravy, cover with foil, and warm gently in a 300°F (150°C) oven for 10-15 minutes.
Common Mistakes & Fixes
| Mistake | Fix |
|---|---|
| My roast is tough and dry. | This is almost always a result of overcooking. Sirloin tip is a lean cut and does not benefit from being cooked past medium. An instant-read meat thermometer is the best tool to prevent overcooking. |
| I didn’t get a good crust on my roast. | Your pan was not hot enough, or the roast was not dry enough. Patting the meat completely dry with paper towels and using a screaming-hot, preheated pan are the two most important factors for a great sear. |
| All the juices ran out when I sliced it. | You didn’t let the roast rest long enough. The 15-20 minute resting period is not optional. It is a scientific process that allows the muscle fibers to relax and reabsorb their juices. |
| My garlic in the rub burned during searing. | Minced garlic can burn easily over high heat. You can help prevent this by making sure it’s part of a wet paste with the olive oil, which protects it slightly. Alternatively, you can use whole, smashed garlic cloves instead of minced. |
FAQs
Can I cook this roast from frozen?
It is not recommended to cook a roast from a frozen state. It will cook very unevenly, with the outside being overcooked long before the inside has a chance to thaw and cook through.
Always make sure your roast is fully thawed before you begin.
How do I slice a roast “against the grain”?
Look closely at the cooked meat. You will see the muscle fibers running in a single direction. To slice “against the grain,” you need to orient your knife so that you are cutting perpendicular to these lines.
This breaks up the long muscle fibers, making each slice much more tender to eat.
What is the difference between a sirloin tip roast and a top sirloin roast?
They are two different cuts of meat. The sirloin tip roast comes from the “round” primal, which is closer to the hip of the animal.
It is leaner than top sirloin, which comes from the “sirloin” primal, closer to the loin. Both are flavorful, but the sirloin tip benefits most from a low and slow roasting method like this one.
Enjoy Your Perfect Roast Dinner!
You are now ready to cook a beautiful beef sirloin tip roast that is perfect for a Sunday dinner or any special occasion.
This recipe proves that you don’t need an expensive cut of meat to produce a tender, juicy, and incredibly flavorful centerpiece for your meal. Enjoy every slice!