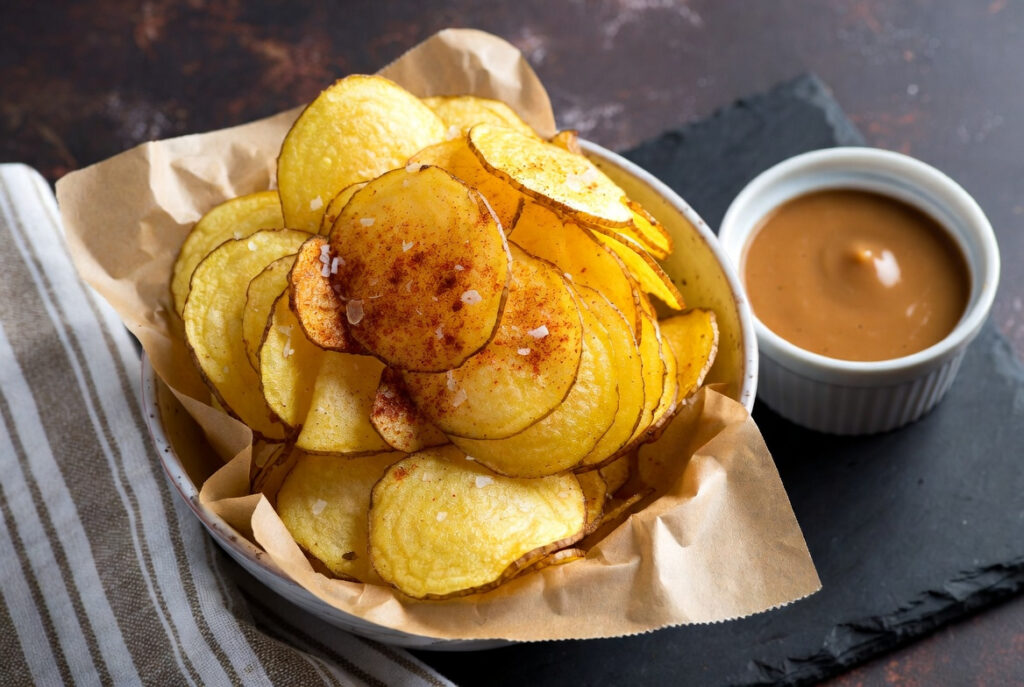
Homemade Potato Chips in the Air Fryer: Because the Bag is Never Enough
You open a bag of store-bought chips, eat the whole thing in twelve minutes, feel vaguely hollow inside, and then wish there were more. We’ve all been there. What if you could make your own crispy, crunchy, perfectly seasoned potato chips at home—with almost no oil, zero mystery ingredients on the label, and the deeply satisfying knowledge that you made this yourself? Your air fryer has been waiting for this assignment. Let’s give it something to do.
Recipe Overview
| Prep Time | Cook Time | Total Time | Servings | Skill Level |
|---|---|---|---|---|
| 15 minutes | 15–18 minutes per batch | 30–35 minutes | 3–4 | Easy |
Why This Recipe Is Awesome
Let’s be completely honest about store-bought chips for a second. You’re paying for a bag that’s roughly 40% air, eating chips fried in industrial quantities of oil, and consuming a seasoning list that reads like a chemistry exam. Homemade air fryer chips have exactly as many ingredients as you decide to put in them—and every single one you can actually pronounce.
The air fryer turns out shockingly good chips. We’re talking genuinely crispy, audibly crunchy, light-as-air rounds that hold up to dipping, stacking, and aggressive snacking. The secret is the combination of thin slicing, a cold water soak to remove excess starch, and the air fryer’s relentless hot-air circulation doing what it does best.
Is it idiot-proof? Mostly yes. The one area that trips people up is slice thickness—too thick and you get chewy, not crispy. But once you nail that step, everything else falls into place beautifully. FYI, a mandoline slicer makes this whole recipe borderline effortless and gets you that restaurant-thin consistency every single time. Highly worth the investment.
The best part? You control the flavor entirely. Classic salt. Smoky barbecue. Sour cream and onion. Spicy chili lime. Your air fryer chips, your rules.
Ingredients You’ll Need
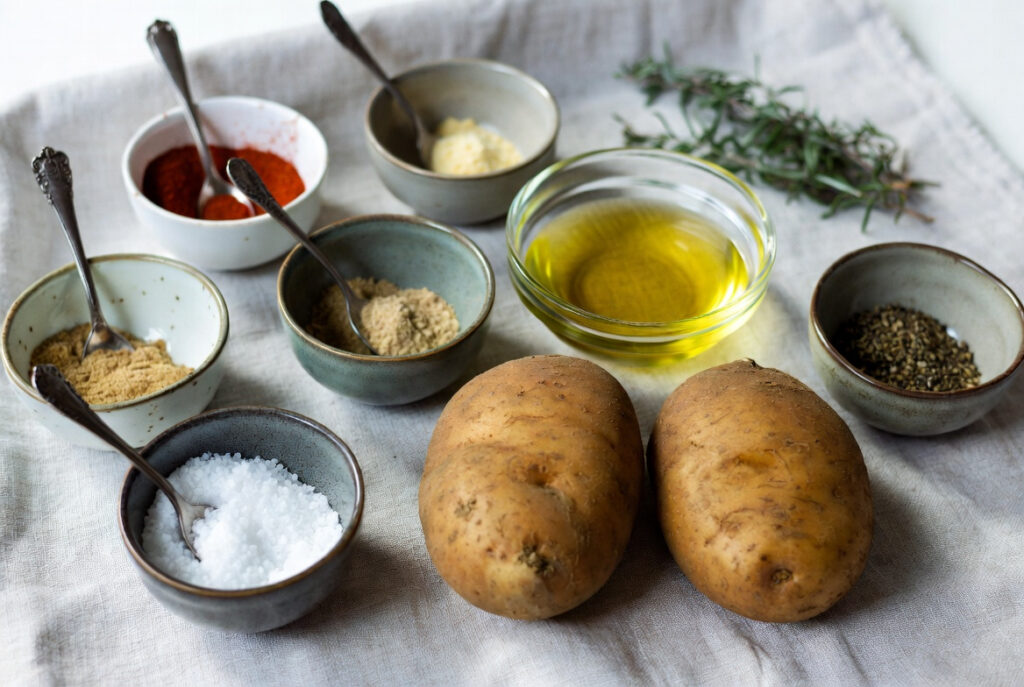
- 2 large russet potatoes — starchy, firm, and ideal for chips. Their low moisture content is exactly what you want for maximum crunch
- 1 tablespoon olive oil — just a light coating. You want crispy chips, not an oil slick
- ½ teaspoon salt — the non-negotiable baseline. Season immediately after cooking while they’re still hot
- ½ teaspoon garlic powder — because garlic powder belongs on almost everything savory, and chips are no exception
- ¼ teaspoon smoked paprika — adds color and a subtle depth that plain salt alone can’t achieve
- ¼ teaspoon onion powder — the supporting character that quietly elevates the whole flavor profile
- Optional: pinch of cayenne — for people who like a little danger in their snacking
- Optional: 1 teaspoon nutritional yeast — adds a cheesy, savory quality that’s genuinely addictive if you haven’t tried it yet
Step-by-Step Instructions
1. Wash and scrub your potatoes thoroughly — no need to peel them. The skin adds flavor and crisps up nicely on thin slices. Leaving it on also saves you prep time, which is always a win. Just make sure there’s no dirt left behind.
2. Slice the potatoes as thinly and evenly as possible — aim for about 1/16 inch thick. This is the most important step in the entire recipe. A mandoline slicer set to the thinnest setting is your best friend here. If you’re using a knife, take your time and slice as consistently as you can. Uneven slices mean some chips burn while others stay chewy. Neither outcome is acceptable.
3. Soak the sliced chips in a bowl of cold water for at least 15–20 minutes. This pulls out the surface starch that prevents proper crisping. After soaking, drain them completely and spread them on a clean kitchen towel or paper towels. Pat them as dry as you possibly can. Moisture is the enemy of crunch. Dry them like your crispy chips depend on it—because they do.
4. Preheat your air fryer to 360°F (182°C) for 3–4 minutes. Note this is slightly lower than most air fryer recipes—potato chips are thin and delicate, so a slightly lower temperature gives them more time to dehydrate and crisp evenly without burning at the edges before the center cooks through.
5. Toss the dried potato slices in olive oil until lightly coated, then add your dry seasonings. Use your hands to toss everything gently. Every slice should have a thin, even coat of oil—not pooling, not dry patches. Think of it as moisturizer for your chips. A very light, savory moisturizer.
6. Lay the chips in a single layer in the air fryer basket—this is non-negotiable. No overlapping, no stacking. You will almost certainly need to cook these in multiple batches, and that’s completely fine. Resist the urge to pile them in and “see what happens.” What happens is disappointment.
7. Air fry at 360°F for 15–18 minutes, checking and flipping gently every 5–6 minutes. Watch them closely in the last few minutes—chips go from golden to burnt with alarming speed. Pull them when they’re golden brown and starting to look crispy. They’ll firm up even more as they cool.
8. Transfer to a wire rack immediately and season with extra salt while still hot. The wire rack lets air circulate underneath so they stay crispy instead of going soft from trapped steam. Salt sticks best when the chips are fresh out of the air fryer and still warm.
Common Mistakes to Avoid
| Common Mistake | Solution |
|---|---|
| Slicing too thick | Thicker than 1/16 inch and you’ll get chewy chips, not crispy ones. Use a mandoline—it’s the single best investment for this recipe. |
| Skipping the cold water soak | Surface starch is what stops chips from crisping properly. Soak for at least 15 minutes, then dry them completely. Both steps matter. |
| Not drying thoroughly after soaking | You soaked them to remove starch, then left them wet. Don’t undo your own good work. Pat them bone dry before adding oil. |
| Overlapping chips in the basket | Overlapping means steaming, and steaming means soft chips. Single layer every time, no exceptions. Yes, even when you’re impatient. |
| Walking away in the last few minutes | Thin potato chips go from perfect to carbon in about 90 seconds. Stay close, check frequently, pull them the moment they look golden. |
| Skipping the wire rack after cooking | Setting chips on a plate traps steam underneath and makes them soft. Always cool on a wire rack so air circulates all around them. |
| Adding salt before cooking | Salt draws out moisture during cooking, which works against crispiness. Season with dry spices before cooking, add extra salt immediately after. |
Alternatives & Substitutions
Potato variety swaps: Russets are the top choice for chips because of their high starch and low moisture content—ideal for crispiness. Yukon Golds also work and give you a slightly buttery, richer flavor, though they can be a touch less crispy. Sweet potatoes make a fantastic alternative with a naturally sweet flavor—just watch them more closely as they brown faster.
Oil alternatives: Any neutral high-smoke-point oil works well here—avocado oil, light vegetable oil, or refined coconut oil all perform great. IMO, avocado oil gives you the cleanest flavor that lets the seasonings come through without any competing taste.
Flavor variations to try: This is where things get genuinely fun. Classic sea salt and vinegar (add the vinegar as a mist spray before cooking). Sour cream and onion (onion powder plus a light dusting of citric acid after cooking). Spicy chili lime (chili powder, cumin, lime zest after cooking). BBQ style (smoked paprika, brown sugar, garlic powder, a pinch of cayenne). Each one is legitimately delicious, and experimenting costs almost nothing.
Parmesan chips: Toss cooked chips with finely grated Parmesan while still hot and return to the air fryer for 60–90 seconds. The cheese melts and crisps onto the surface in a way that is almost unreasonably good. Consider yourself warned.
No mandoline? A sharp chef’s knife and patience can get you there—just focus on keeping every slice as thin and consistent as possible. Alternatively, a food processor with a slicing disc works well and is faster than doing it by hand.
FAQ (Frequently Asked Questions)
Q. Why aren’t my air fryer potato chips coming out crispy?
Ans: One of three things—your slices were too thick, you didn’t dry them well enough after soaking, or you overcrowded the basket. All three of these kill crispiness dead. Thin slices, thoroughly dried, in a single layer with breathing room. Fix all three and you’ll get the crunch you’re after. Also make sure you’re cooling them on a wire rack, not a plate, so steam doesn’t soften them from below.
Q. Do I absolutely need a mandoline slicer for this recipe?
Ans: You don’t need one, but you’ll want one after your first attempt without it. Getting uniformly thin slices with a knife takes real skill and patience. A mandoline gets you paper-thin, perfectly consistent slices in a fraction of the time, which directly translates to more evenly cooked, crispier chips. They’re inexpensive and genuinely useful for a dozen other recipes. It’s worth it.
Q. How long do homemade air fryer chips stay crispy?
Ans: At their absolute best, fresh out of the air fryer. They’ll stay crispy for a few hours at room temperature if stored in a single layer or loosely in a bowl—not in an airtight container, which traps moisture and softens them. If you’re making them ahead, store in a paper bag or an open container. They’re best eaten the same day, which honestly shouldn’t be a problem.
Q. Can I make chips from other vegetables the same way?
Ans: Yes, and you should. Zucchini chips, beet chips, carrot chips, and kale chips all work brilliantly in the air fryer using the same basic technique. Adjust cook times based on the moisture content of the vegetable—higher moisture veggies like zucchini need longer at lower temps. Each one is its own satisfying experiment worth trying.
Final Thoughts
And there it is—homemade air fryer potato chips that are crispier, more flavorful, and infinitely more satisfying than anything you’ll pull out of a crinkly bag from the store. You control the seasoning, the thickness, the flavor profile, and the quantity. No mystery additives, no unnecessary oil, no paying premium price for a bag that’s mostly nitrogen.
The learning curve here is gentle. Nail the slice thickness, respect the soak-and-dry step, work in single layers, and watch them closely in the final minutes. Do those four things and you’ll turn out genuinely great chips every single time.
Then start experimenting. Salt and vinegar. BBQ. Spicy chili lime. Parmesan. The options are genuinely endless, and every variation is worth trying at least once. You might find a flavor combination that becomes your signature snack—the thing friends request when they come over.
Now go impress someone—or just yourself on a quiet evening with a bowl of ridiculously good homemade chips—with your new air fryer skills. You’ve absolutely earned that crunch.