The Best Easy Homemade Chicken Enchilada Recipe
When you’re craving a meal that is the absolute definition of cheesy, saucy, and satisfying comfort food, a pan of homemade chicken enchiladas is the perfect answer.
This is a dish that’s guaranteed to be a hit with the whole family, and it’s so much better than anything you can get from a restaurant.
This recipe is all about creating layers of incredible flavor with surprisingly little effort. We’ll be making a simple but deeply flavorful homemade red enchilada sauce that will blow any canned version out of the water.
We’ll use this amazing sauce to coat soft corn tortillas filled with a savory mixture of tender shredded chicken and gooey cheese. Baked until hot, bubbly, and golden-brown, this is a truly spectacular meal.
Forget the shortcuts. Let’s make a real-deal pan of enchiladas that will have everyone asking for seconds.
Essential Tools
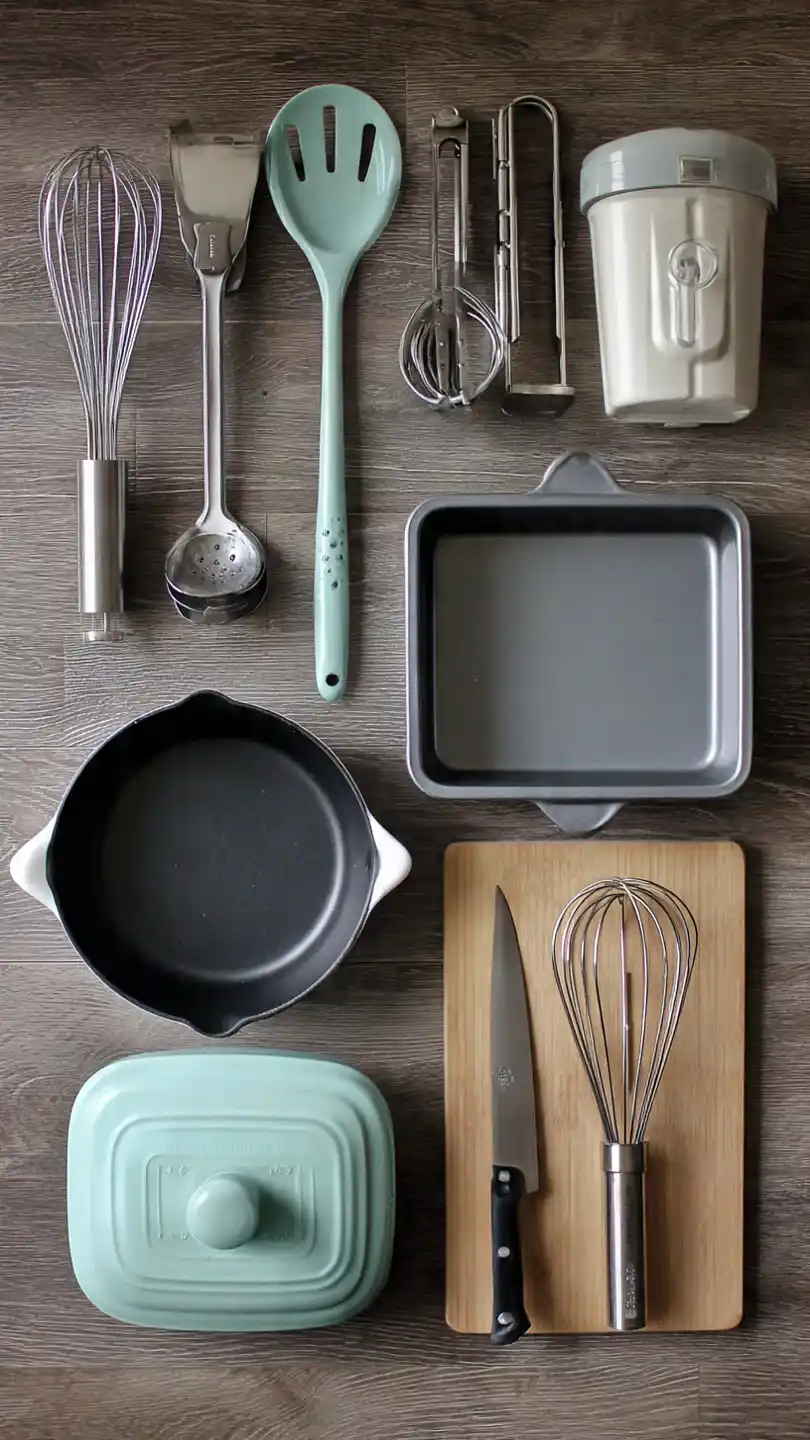
- Large Skillet or Dutch Oven
- 9×13 inch Baking Dish
- Blender (optional, for a smoother sauce)
- Whisk
- Tongs
- Sharp Knife and Cutting Board
Quick Recipe Snapshot
Here’s a quick look at the timeline for this incredibly flavorful and comforting bake.
| Prep time | Cook time | Total time | Yield | Skill level | Spice level |
|---|---|---|---|---|---|
| 25 minutes | 35-40 minutes | ~1 hour | 4-6 servings (10-12 enchiladas) | Easy | Mild-Medium |
Ingredients
This recipe uses a simple homemade sauce and a classic filling for an authentic and delicious result.
For the Homemade Red Enchilada Sauce:
- Dried Ancho or Guajillo Chiles: 2-3, stemmed and seeded (optional, for deep flavor).
- Canned Tomato Sauce: 1 (15 oz) can.
- Chicken Broth: 2 cups.
- Aromatics: ½ onion, and 3 cloves of garlic.
- Spices: 1 tbsp chili powder, 1 tsp cumin, ½ tsp dried oregano.
- Olive Oil: 2 tbsp.
For the Chicken Filling & Assembly:
- Shredded Cooked Chicken: 4 cups. A store-bought rotisserie chicken is a great shortcut.
- Corn Tortillas: 10-12.
- Shredded Cheese: 3 cups, a Mexican blend, Monterey Jack, or Colby Jack is perfect.
- Onion: ½, finely chopped.
- Oil for frying tortillas.
- Toppings: Sour cream, chopped cilantro, sliced avocado.
The Flavor Architects A Look at the Ingredients
- Dried Chiles: This is the secret to a truly authentic enchilada sauce. Ancho chiles provide a deep, smoky, and slightly sweet, raisin-like flavor, while Guajillo chiles offer a brighter, tangier flavor with a mild heat.
- Chili Powder & Cumin: The classic duo that forms the backbone of Tex-Mex flavor. The chili powder provides an earthy, savory base, while the cumin adds a warm, nutty, and slightly bitter aroma.
- Corn Tortillas: For the most authentic flavor and texture, corn tortillas are the way to go. A quick fry in hot oil makes them pliable and also creates a barrier that prevents them from getting mushy in the sauce.
- Shredded Cheese: The delicious “glue” of the dish. A good melting cheese like Monterey Jack is essential for that perfect gooey, cheesy pull inside the enchiladas and a beautiful golden-brown crust on top.
Cooking Instructions
This incredible chicken enchilada recipe is a rewarding process of building a flavorful sauce and creating a perfectly cheesy, saucy bake.
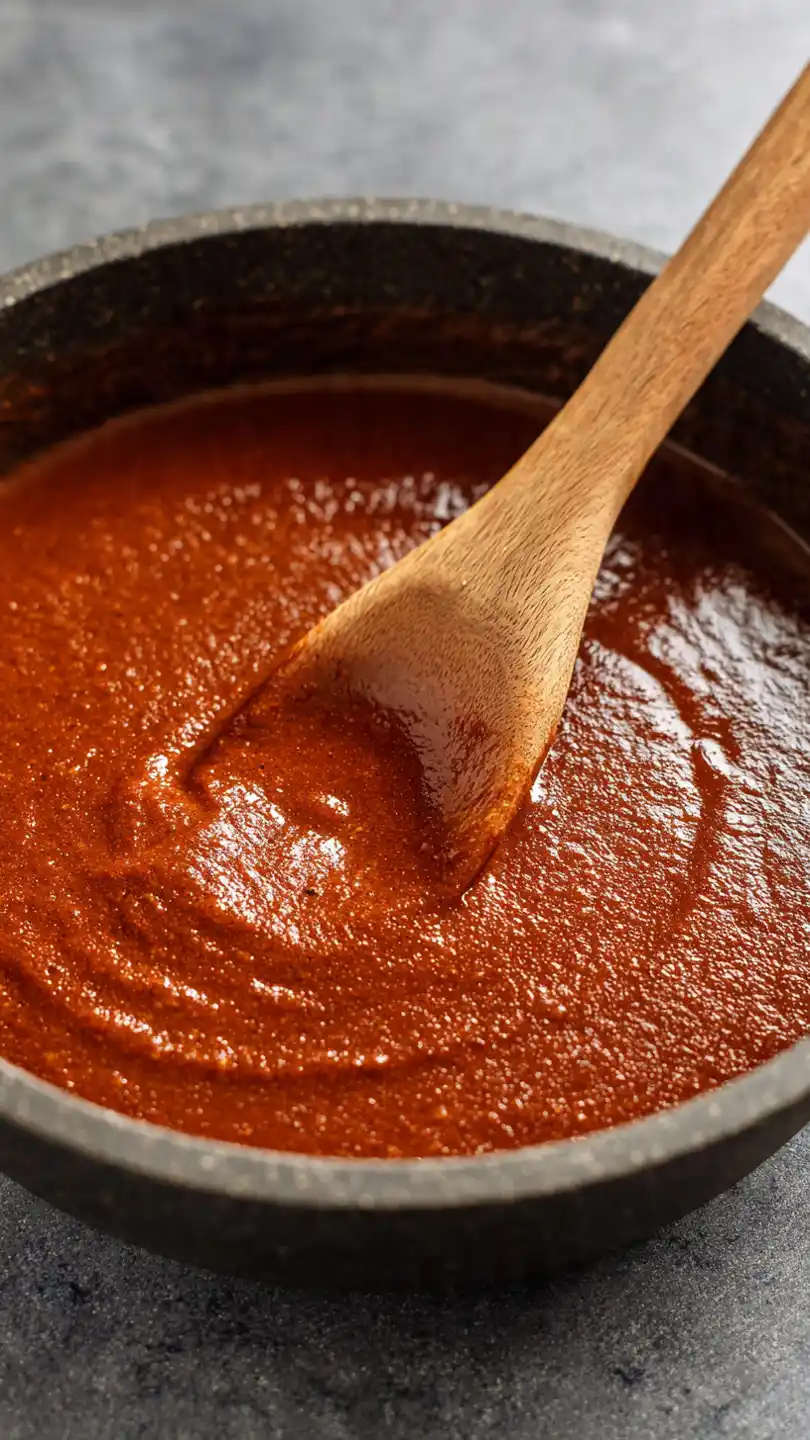
Step 1: Create the Enchilada Sauce
First, if using dried chiles, toast them in a dry skillet for 30 seconds per side until fragrant, then soak them in hot water for 20 minutes to soften.
In a large skillet or Dutch oven, heat the olive oil over medium heat. Add the ½ chopped onion and cook for 5-7 minutes until soft. Add the garlic and all the dry spices (chili powder, cumin, oregano) and cook for one more minute until fragrant.
Add the softened, drained chiles, the can of tomato sauce, and the chicken broth. Bring the sauce to a simmer and let it cook for 10 minutes. Carefully transfer the sauce to a blender and blend until completely smooth.
Step 2: Prepare the Filling and Tortillas
While the sauce simmers, you can prepare your filling. In a large bowl, combine the 4 cups of shredded chicken with about 2 cups of the shredded cheese and the other ½ of finely chopped raw onion. Mix it all together.
Next, prepare your tortillas. Pour about a half-inch of neutral oil into a clean skillet over medium-high heat. Once the oil is hot, use tongs to fry each corn tortilla for just 10-15 seconds per side.
You just want to soften them and make them pliable, not make them crispy. Transfer the softened tortillas to a paper towel-lined plate to drain.
Step 3: The Art of Assembling the Enchiladas
Now it’s time to build your masterpiece. Preheat your oven to 375°F (190°C). Pour about a cup of your homemade red sauce into a shallow dish (like a pie plate).
Pour another cup of sauce into the bottom of a 9×13 inch baking dish and spread it around to coat. Working one at a time, dip a softened tortilla into the sauce in the shallow dish, coating both sides.
Place the saucy tortilla in your hand, spoon a generous line of the chicken and cheese filling down the center, and roll it up snugly.
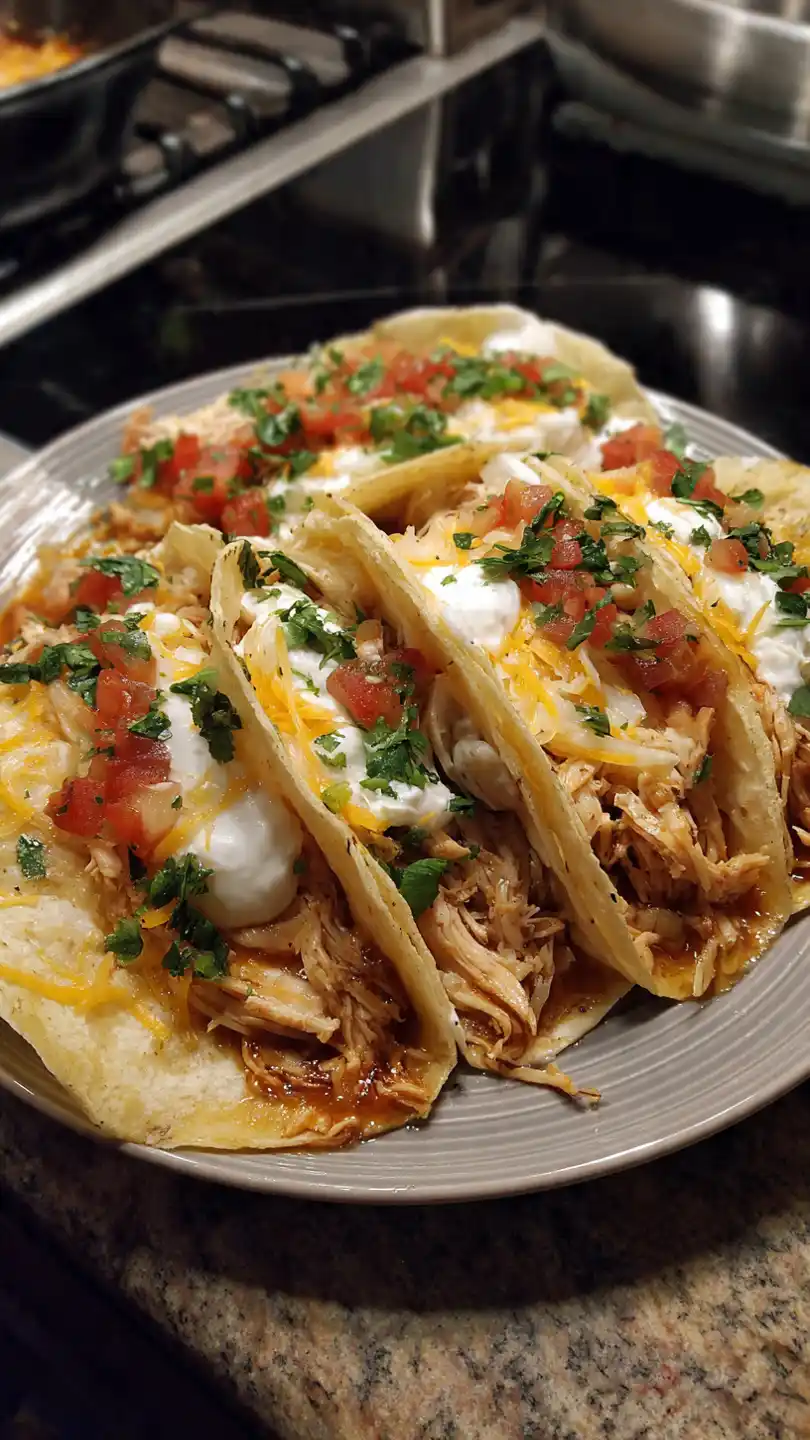
Step 4: Arrange, Smother, and Bake
Place the rolled enchilada seam-side down in the prepared baking dish. Continue this process with the remaining tortillas, arranging them tightly in a single row until the dish is full.
Pour the rest of your delicious red enchilada sauce evenly over the top, making sure to cover them from end to end. Sprinkle the remaining 1 cup of shredded cheese all over the top.
Bake, uncovered, for 20-25 minutes, until the sauce is hot and bubbly and the cheese is melted and just starting to turn golden-brown. Let the enchiladas rest for 5-10 minutes before serving.
Recipe Variations
This classic enchilada recipe is a great base for your own favorite flavors.
- Make it Spicy: For a spicy kick, add 1-2 minced chipotle peppers in adobo to your sauce before you blend it, or add a can of diced green chiles to your chicken and cheese filling.
- Creamy Enchiladas Suizas: Make a “green” version by using a tomatillo-based salsa verde instead of red sauce. Stir ½ cup of heavy cream or sour cream into the sauce before pouring it over the enchiladas for a rich and creamy finish.
- Add Beans: For an even heartier filling, add a can of rinsed and drained black beans to the chicken and cheese mixture.
Serving Suggestions
Serve the hot and bubbly enchiladas with a variety of fresh, cool toppings to balance the rich, savory flavors.
- The Classics: A dollop of cool sour cream, a sprinkle of fresh chopped cilantro, and some sliced black olives are the perfect finishing touches.
- Fresh Toppings: Diced avocado or a scoop of guacamole adds a wonderful creamy texture. Thinly sliced radishes or shredded iceberg lettuce can add a nice, cool crunch.
- Simple Sides: These enchiladas are a meal in themselves, but they are great served with a side of Mexican rice and refried beans.
Storage & Reheating Tips
These enchiladas make for fantastic leftovers.
- Storage: Let the enchiladas cool. Cover the baking dish tightly with foil or transfer them to an airtight container. Store in the refrigerator for up to 4 days.
- Reheating: For the best results, reheat the enchiladas in an oven at 350°F (175°C) for 15-20 minutes, or until heated through. The microwave also works for individual portions, but the tortillas will be softer.
Common Mistakes & Fixes
| Mistake | Fix |
|---|---|
| My corn tortillas fell apart. | You likely skipped the frying step. Corn tortillas will break and turn to mush in the sauce if they are not briefly fried in hot oil first. This simple step makes them pliable and creates a barrier that helps them hold their shape. |
| The enchiladas are a bit dry. | Be generous with your sauce! It’s important to put a layer on the bottom of the pan and to completely smother the enchiladas on top. The tortillas will absorb a lot of sauce as they bake. |
| My homemade sauce is bitter. | You may have burned your dried chiles when you toasted them. They only need 15-30 seconds per side until they are fragrant. If they smoke heavily, they will become bitter. A small pinch of sugar in the sauce can sometimes help balance a little bitterness. |
| The cheese on top is oily. | This often happens with pre-shredded cheeses, which are coated in starches. For the best, smoothest, and least oily melt, it’s always recommended to shred your own cheese from a block. |
FAQs
Can I use flour tortillas instead of corn?
You can, and it’s a common shortcut. Flour tortillas are much softer and you can skip the step of frying them.
The final dish will have a softer, more casserole-like texture, which many people enjoy, but it will be less traditional than a classic chicken enchilada recipe.
Can I assemble the enchiladas ahead of time?
Yes, this is a great make-ahead meal. You can fully assemble the entire pan of enchiladas, cover it tightly with foil, and store it in the refrigerator for up to 24 hours.
When you’re ready to eat, you may need to add about 10 minutes to the total baking time since it’s starting from cold.
Can I freeze chicken enchiladas?
Yes, they freeze beautifully. Assemble the enchiladas in a freezer-safe baking dish, but do not bake them. Cover the dish tightly with a layer of plastic wrap and then a layer of foil. They can be frozen for up to 3 months.
To bake, remove the plastic wrap, cover with the foil, and bake from frozen at 375°F (190°C) for about 45-55 minutes, then uncover and bake for another 10 minutes until bubbly.
Enjoy Your Cheesy, Saucy Masterpiece!
You are now ready to make a pan of incredible, homemade chicken enchiladas that will rival any restaurant.
The extra step of making your own sauce is so worth it for the deep, authentic flavor it brings. I hope you and your family love this comforting and delicious meal!